| The Small Volume Flow Through Cell bolt-on option for the LISST-100X allows for continuous size distribution measurements in a flow through operation. The system uses a precision glass cylinder to reduce the optical path from the standard 50mm to 10mm. This reduces the total volume of the cell, eliminates any potential for trapped particles, and allows for quicker exchange of sample. The reduced optical path will also increase the maximum concentration by a factor of 5 over the standard path system.
Special Note: Because the optical path is reduced the output of volume concentration will need to be scaled to correct for the reduction of the optical path. This can be done by multiplying the volume concentration output for each size class by 5 in post processing. Alternatively the Volume Conversion Constant for the instrument can be changed to include this correction factor. To adjust the Volume Conversion Constant (VCC) divide the full path value VCC by 5.
Caution: Be sure to return the VCC value back to the original value when the Flow through Cell is removed.
Step 1: Assemble Flow Through Cell as shown in Figure 1. The faces of the glass cylinder must be clean. If required, clean the surfaces with mild liquid dish soap and a clean finger. Optical windows of the LISST-100X should also be cleaned if needed. Make sure that the face O-rings on the Main Cell and the Slider are installed. The Main Cell O-ring is a Parker 2-019 and the Slider face O-ring is a Parker # 2-014. The Slider radial O-ring is a Parker#2-015. Extra O-rings have been provided.
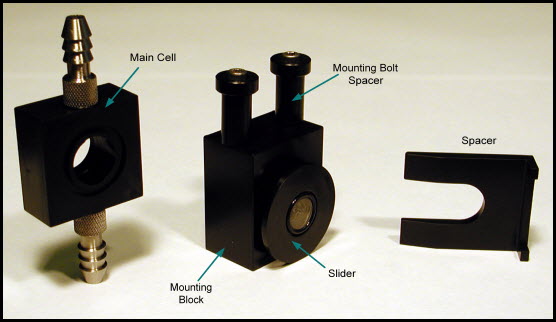
Figure 1: Small Volume Flow Through Cell for the LISST-100X
Step 2: Insert the Slider into the Main Cell until only a small gap is remaining. Leaving a small gap will make it easier to install the Spacer in later steps (Figure 2).
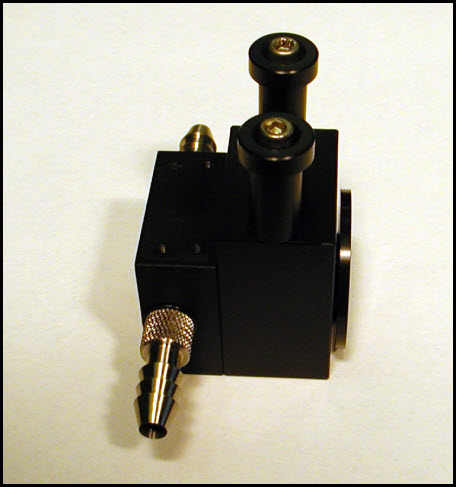
Figure 2: Small Volume Flow Through Cell body pre-assembled and ready for installation.
Carefully insert the assembly into the optical path of the LISST-100X. Be careful not to touch the o-rings or other parts to the optical windows of the LISST-100X. The Slider should be oriented toward the small window and the open end of the Main Cell should be toward the larger window. The holes in the Mounting Block should line up with the holes in the LISST-100X Crossbar Standoffs. While pressing the Main Cell against the LISST-100X endcap install the Mounting Bolt Spacers and Bolts. Tighten bolts to just over finger tight using the Allen wrenches provided with the LISST-100X. The screws thread into plastic and over tightening can cause the threads to strip. The mounted assembly should appear as shown in Figure 3.
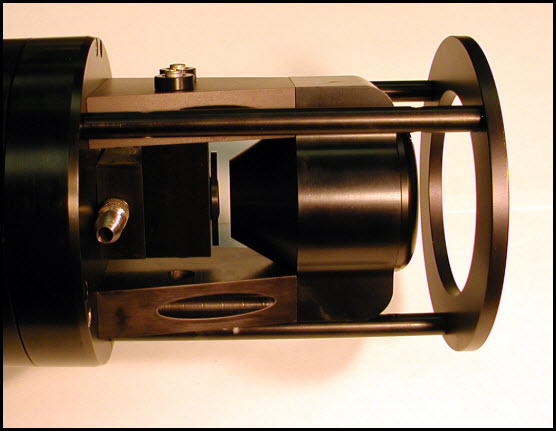
Figure 3: Small Volume Flow Through Cell body mounted to LISST-100X Cross Bar Standoff.
Step 3: Rotate the complete LISST-100X instrument into a vertical orientation such that it is resting on the Endcap Ring with the transmit optics down (Figure 4).
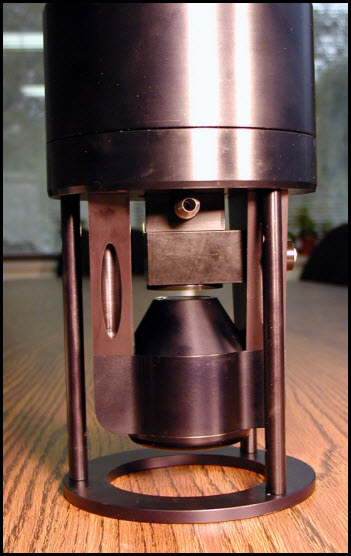
Figure 4: LISST-100X in vertical position.
To maintain optical alignment there must be a drop of water between the glass Small Window and the glass cylinder inside the Slider. By orienting the LISST-100X vertically it is much easier to get a drop off water to stay in place while the rest of the assembly procedure is completed. Using a small eye dropper insert a large drop of filtered water between the Small Window and Slider. Figure 5 shows the typical size drop that is required.
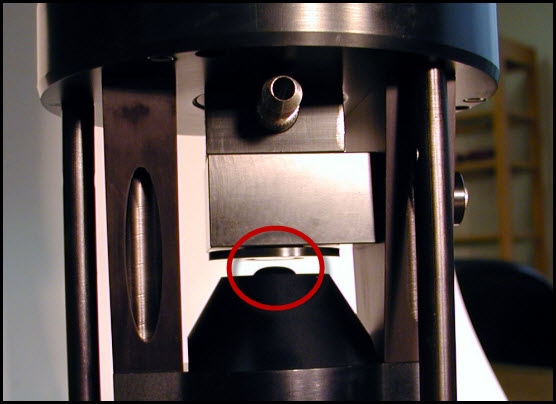
Figure 5: Size and placement of the drop of water is shown.
It is very important that there be no air bubbles in this drop of water. Slowly lower the Slider onto the Small window by inserting the Spacer between the Slider and Mounting Block. If needed use a small flat screwdriver to increase the gap large enough for the Spacer to be inserted. This will hold the Slider against the small window. Excess water will be pushed out leaving only a small film of water between the glass surfaces. Care must be taken to make sure that no air bubbles are trapped between the glass surfaces.
Step 4: After installing the Flow Through Chamber we must now obtain a clean water background before acquiring size distribution data. The extra glass cylinder and the drop of water between the Small Window and Slider glass the background scattering may produce additional optical scattering. This may cause the clean water background to be slightly higher than the background obtained without the chamber installed.
However, if the Slider glass is clean and there are no bubbles between the glass surfaces the background should be very close to the standard background. Remember to fill the chamber with clean water before obtaining a background. It is recommended that the clean water be pumped through the chamber before acquiring a background to make sure any trapped bubbles have escaped. Just filling the chamber without pumping can allow a large bubble to get trapped and cause the background to be unacceptable. If the background is not close to factory values, first make sure there are no bubbles in the chamber and that the water is clean. Secondly, remove the Spacer and clean the Small Window and Slider glass and replace the drop of water between them. Follow the standard procedures outline in the LISST-100X User’s Manual to obtain the background.
If you have any additional questions regarding this installation please contact Sequoia Scientific technical support or your local representative. |